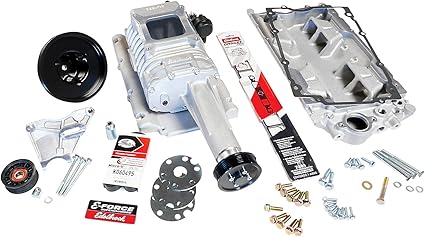
The installation of the Edelbrock 1551 E-Force Supercharger can significantly elevate an engines performance. This guide provides practical tips to help beginners successfully install this supercharger, enhancing the experience of any performance enthusiast.

Edelbrock 1551 E-Force Supercharger Installation Guidelines for Newbies
The basic tools needed for installing the Edelbrock 1551 E-Force Supercharger include socket wrenches, screwdrivers, and a torque wrench. Beginners should expect the installation process to take approximately 8 to 10 hours, depending on experience and workspace organization.
Common mistakes beginners should avoid involve skipping essential steps outlined in the manual and neglecting to prepare the work area adequately. Detailed installation instructions are readily available through the Edelbrock website or in the installation manual included with the Supercharger Kit for Small-Block Chevys.

What essential tools do you need for a successful supercharger setup?
A 10mm and a 13mm socket wrench are required for the successful installation of the E-Force Supercharger Kit 1551. Typically, an installation involves securing around 25 to 30 screws, depending on the specific vehicle configuration and accessories.
The recommended torque setting for the supercharger mounting bolts is usually between 18 to 20 ft-lbs, ensuring a reliable fit. Allocate around 8 hours for the entire process, factoring in time for adjustments and final checks for quality control.
Edelbrock 1551 E-Force Supercharger Wiring and Electrical Tips for Starters
Wiring modifications necessary for a successful install of the Edelbrock 1551 E-Force Supercharger include connecting the provided wiring harness to the vehicles electrical system. Properly connecting the superchargers electrical components involves following the detailed instructions in the manual, ensuring optimal reliability and efficiency.
Safety precautions such as disconnecting the vehicles battery and working in a well-lit environment help prevent electrical mishaps. For a comprehensive electrical wiring diagram, enthusiasts can visit the Edelbrock official website or consult the installation instructions that come with the supercharger.

How can you safely connect the electrical system during installation?
Connecting five to seven wires is necessary for the electrical setup of the 1551 E-Force Supercharger. A 12-gauge wire is recommended for installation to handle the required electrical load safely.
Keep electrical components at least 12 inches away from the engine to avoid exposure to excessive heat. The maximum voltage rating for these electrical components is typically around 14 volts, ensuring compatibility with most automotive systems.
Edelbrock 1551 E-Force Supercharger Performance Tuning Tips for Beginners
Post-installation tuning options available for the Edelbrock 1551 E-Force Supercharger include adjusting the air-fuel mixture and ignition timing to enhance performance. To ensure optimal performance after installing the supercharger, regular data testing during tuning sessions allows beginners to fine-tune the engine’s behavior effectively.
Common tuning mistakes beginners make include overlooking air-fuel ratios and neglecting to log data during the tuning process. For professional tuning services, local performance shops specializing in Edelbrock products often provide expert assistance, ensuring ideal setups.
What are the basic tuning strategies after a supercharger installation?
Generally, two to three tuning sessions are needed for optimal performance from the Edelbrock 1551 E-Force Supercharger. The target air-fuel ratio for peak performance typically falls around 12.5:1, striking a balance between power and efficiency.
Proper tuning can yield an impressive horsepower gain of 50 to 100 horsepower depending on vehicle setup and tuning adjustments. Recommended RPM settings for safety usually hover between 6,000 and 6,500 RPM, avoiding potential damage to engine components while maximizing performance.